Frank and Jan's Pond Page
Building Our Pond Filter
A Gravity Fed, Mechanical and Bio Filter
for About $100
Updated 1/07/01
Go to Bottom
Jump to:
When we started building our pond in August 2000, I was concerned about
the small in-pond pump and filter that came with it. After reading
some Internet pages from very helpful ponders, I adopted a design for our
filter that would utilize a relatively large mechanical and bio filter
media area outside of the pond using simple, everyday items rather than
buying a pre-made filter. I also wanted to avoid multiple pumps and
the extra energy they consume, and didn't want the filter to interfere
with the appearance of the pond in the corner of the yard.
Now, 2 months after its installation, I can consider the filter a success.
The pond is clear, with plenty of water flow, and the filter has been trouble-free.
Putting a filter outside the pond means you have to get the water to
the filter, through the media, and back to the pond. Some people
use an in-pond submersible pump, pump water over to the filter, through
the filter media and allow the water to spill into a stream bed for the
return to the pond. I couldn't do this without the filter showing
above ground. Another method is to use two pumps, one to pump water
into the filter, and another to pump it back into the pond. The third
method has the filter in the ground, at the same level as the pond, and
a pipe between the pond and the filter allows water to flow to the filter.
Then, a pump in the fitler container pumps water back out and into the
pond through unobtrusive plastic tubing. As the water is pumped out,
water flows from the pond through the pipe to the filter. A good
website showing this concept is at xxxxxxxxxxx. For ease of cleaning,
I decided to use the horizontal flow method the website shows. And
using the math there, I determined that for my small pond, 2" ABS drain
pipe would be plenty big enough to allow enough water to flow through it.
In addition to the mechanical and bio filtration provided by this filter,
we decided to have a veggie filter also. We're using another pond
that will be stocked with a lot of plants. The water will be pumped
up from the filter into the veggie filter pond, and then flow down a 3'
stream into the larger pond.
Shopping at Home Depot, I gathered the following materials: 1
Rubbermaid 28 gallon "tote" with lid ($9.97), 2 permanent "hog's hair"
air filters for forced air units ($3.87 each), 1 plastic "light panel"
($7.97), 2 shower drains ($3.89 each), and enough 2" black ABS pipe to
reach from the pond to the filter. Later, I purchased some red lava
rock from the local landscape supply place for $7. I had some other
"optional" expenses you'll see in the photos below, but they really weren't
needed.
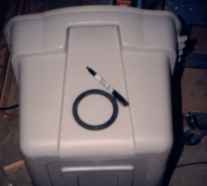 |
Here is the gasket from the shower drain positioned on a relatively
flat area of the Rubbermaid tub. You'll find the shower drains where
the plumbing supplies are for installing a fiberglass shower unit.
They have ones for tile showers out of cast iron, but you want the ABS
plastic ones that have the drain grate, a flange, two gaskets and a threaded
nut.
The gasket makes a template to mark the tub for the hole, as I did with
the marker pen in the picture. You can carefully cut through the
Rubbermaid tubs with a utility knife if you are patient. Make several
light passes at first, gradually increasing pressure, and soon you are
through the plastic. Trying to cut through quickly could lead to
the knife slipping, and cutting other things, such as body parts, which
are considerably easier to cut than the tub! |
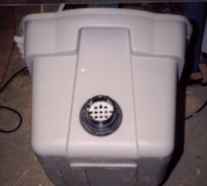 |
Here's the shower drain installed into the tub. A gasket goes
on the flange of the drain (which is white, you can see the back side of
it in the picture.) Then the drain and gasket are pushed through
the hole from the inside of the tub. Then, another gasket fits over
the pipe portion of the drain, and the large nut is threaded on.
You do need a large pipe wrench or channel lock style pliers to tighten
the nut, but you don't have to go too tight. If the plastic squeeks,
STOP! You can crack the nut if you overtighten it. Its also
important not to put any kind of pipe dope on this, as some of the pipe
dopes can actually cause ABS plastic to crack later on. |
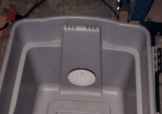 |
Here's the inside of the tub showing the installed shower drain.
You could go through one of the other side walls, or the bottom, as long
as the place you choose is nice and flat relative to the flange on the
shower drain. |
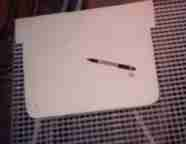 |
Next, I took some stiff cardboard and made a "pattern" of the inside
of the tub. Using scissors, I simply kept trimming the cardboard
until it would fit down into the tub. The large grate you see in
the picture is found in the lighting section, and is used as a light diffuser
for flourescent lights in places like schools (but don't take one from
your school ... they'll put a note in your permanent record!) It
is made of a styrene plastic, which is easy to cut with tin snips, a band
saw, etc. I used the paper pattern to mark the grid with the marker,
and then I cut it out. I actually found tin snips to work better
than my band saw (sometimes hand tools do work better, but don't tell Jan
until I'm through buying all the power tools I want.) |
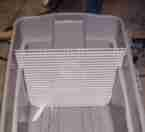 |
Here's a gird piece cut out to fit in the tub. It doesn't have
to fit exactly to the sides, or even go up as high as I have this one.
Realizing that meant I only used one of these light grids (I actually bought
two) and I briefly thought about returning one to my elementary school
to expunge that permanent record thing. But I took it back to Home
Depot instead. |
 |
Here are three girds in the tub. And the pump, a Rio 1700 Power
Head pump that I spent $47.50 on. The two grids at the top of this
photo are hiding the shower drain "inlet" into the tub. |
 |
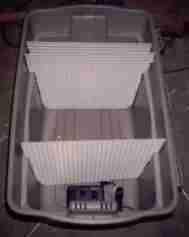
Here you can start to see how the filter shapes up. The permanent
filter material goes between two of the grids. I used three layers
of the material to provide plenty of both "depth" and surface filtration
for debris. The lava rock will go between the bottom grid and the
two top ones. Lava rock is kind of controversial, and a lot of people
prefer other materials like fiberglass insect screening, plastic pallet
strapping, Bio Balls they buy in a store, etc. The idea is to provide
a place for beneficial bacteria to form so they can feast on the stuff
you don't want in your pond. |
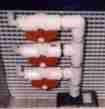 |
OK, here's where I went a little crazy. I made a manifold out
of valves and plumbing fittings so I could direct the water out of the
pond to different areas. Obviously, this is an optional feature.
And these valves and fittings cost as much as most of the other stuff.
But Jan had a giant fish and snail sculpture (yeah, you read that right)
that will spit water into the pond, and I wanted to divert the rest over
the side of the upper "veggie filter" pond when it is too windy to allow
the fish to spit. We had to use the giant fish and snail sculpture
because our kids thought it was too gaudy for us to actually use.
Embarrassing your kids is the only way you can get them back for terrorizing
you when they were 2 years old. |
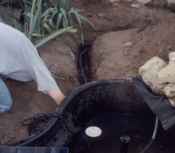 |
Here Dennis, my daughter's boyfriend, is helping me install the other
shower drain in our pre-formed plastic pond (in beautiful natural black,
of course.) The 2" ABS pipe should be level or slope down to where
the filter is recessed into the ground ... if you have a high spot in the
piping, any air can collect there and restrict flow into the filter (and
it would be nearly impossible to get it out of there.) |
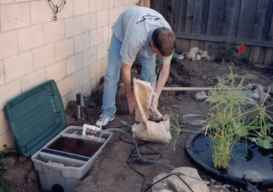 |
Here Dennis is topping off the lava rock in the center section of the
filter. You can see where the shower drain and black ABS pipe is
at the lower end of the Rubbermaid tub on this side. The "veggie
filter" pond is on the right, with a few plants in it. |
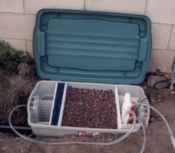 |
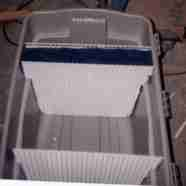
This shows the finished filter, in the ground, hooked up and ready
to fill with water when we re-fill the lower pond. On the left would
be the shower drain "inlet" to the tub (which you can't see in this view
... its in the space before the furnace filter material). This area
before the furnace filter material forms a kind of "sump" for heavier stuff
to fall into rather than collect directly on the filter material.
I used short pieces of the light grid material to hold the vertical grids
in place ... you can see two in that "sump" space if you look closely.
Another two are on either side of the pump at the right end of the tub.
I used aluminum wire to light wire the short pieces to the upright
grids, and just allowed the pressure of the lava rock to then hold the
other ends against the tub walls. |
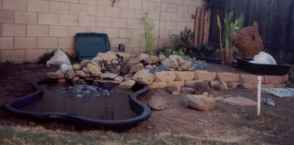 |
We filled the pond, plugged in the pump, and sat back. In this
view, you can see we have a lot of landscaping to do, but when we close
the lid on the filter (which you can see against the block wall back there),
you don't even know a filter is there. The fish and snail sculpture
is on the right, and has been moved now to spit into the little stream
bed between the upper and lower pond (there's so much movement of water
in the upper pond that we had to divert some of it!) |
Landscaping around the Pond
 |
January 7, 2001
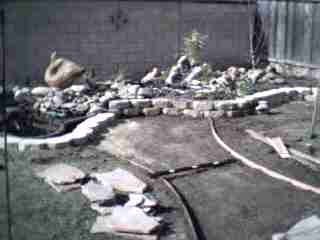
Jan decided she wanted a way to walk out to the pond when it rains,
without getting muddy. I'm usually the one to do outdoor landscape
design, since I once worked in that business (over 20 years ago!)
But she came up with the idea of using flagstones with groundcover growing
in between. Here, we've excavated the area the walk will go in, and
have added some of those self-aligning retaining wall blocks around the
pond area (note that they extend around the front of the pond and back
around the right side.) |
 |
A layer of sand was put down first. Since we don't have to worry
about frost heave in sunny California, we only need enough sand to set
the stones easily so they won't "rock" as you walk on them. That's
only an inch or so. Here, our daughter Kris is brushing more
sand in-between the stones as part of the final prep for planting the ground
cover in the cracks between. Abby, our mini-schnauzer, is sniffing
around like usual. |
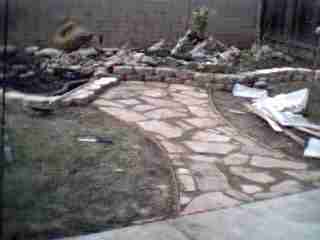 |
Here's the walkway with sand between the stones. The area to
the right will be grass like the area on the left (we'll install sod there
next weekend.) The grass on the left looks bad in this picture, as
there is quite a bit of dirt on it, and the cooler weather means it grows
slowly and doesn't recover quite so fast. This spring we'll "overseed"
it. |
Pond Filter
Links
Norm
Meck's Article on Horizontal Filter Flow is the site where I first
got the idea for a horizontal, gravity fed filter. He has the flow
capacity of pipes listed so you can design one for your needs, and some
info on how much bio media to use. This article is really for koi
ponds, which are larger than our little ones here, so I just scaled the
formulas down.
Leslie's
Puddle has information on an even more simple, elegant design for a
pond filter if you can have it sitting on the side of your pond or stream
bed.
Skippy's
Koi and Pond Page has this article on building a bio filter for a larger
pond than I have. But the concepts he covers in the article helped
me design my little filter.
JJ's Ponds
features another filter that uses gravity feed or a siphon effect.
He has separated out the mechanical, biological and veggie filter into
three separate units for his larger pond, but again, I adapted some of
what he used to build mine.
JD
Stone's Pond Page has a table of links to other filters made by ponders.
Great Pond
and Water Gardening Books

Clicking on the picture or link
will take you to Amazon.com, where you can read the reviews by other readers,
get the ISBN number if you want to get the book at your local book store,
or just see what other works the author has written. You're under
no obligation to buy, of course,but any purchases from Amazon.com when
you click through helps support amature web pages like this one.
 The
Pond Doctor is our favorite. While it has little on filters,
its a great all-around resource for ponding, including how to deal with
algae, identifying the right plants for your pond, etc.
The
Pond Doctor is our favorite. While it has little on filters,
its a great all-around resource for ponding, including how to deal with
algae, identifying the right plants for your pond, etc.
 Water
Gardening Basics has been a great help to us as beginners.
Water
Gardening Basics has been a great help to us as beginners.
 Plants
for Water Gardens helped clear up our questions on what would grow
in our area. Helen Nash is a great author on this subject (she also
wrote our favorite, The Pond Doctor featured above.)
Plants
for Water Gardens helped clear up our questions on what would grow
in our area. Helen Nash is a great author on this subject (she also
wrote our favorite, The Pond Doctor featured above.)
Amazon.com lists hundreds
of books on Water Gardens, but I've only listed the ones I am familiar
with. To see what else they have, click on the graphic below to get
search results. Use the "Back" button on your browser to return here.

Click
here - search all of Amazon.com
for
books on Water Gardening
My Other Obsession ...
When I'm not helping Jan with the pond (mainly
by staying out of her way!) then I'm building my boat, Aslan. See
my boat building page by clicking here: Frank's
Weekender Project. You can also Email
Me by clicking here.
Back to top