The Building of Aslan
Updated 3/17/01
The Building of Aslan |
Updated 3/17/01 |
|
|
|
|
|
|
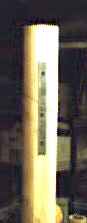 |
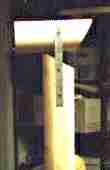
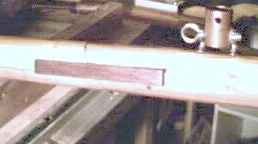
I tried several designs for the tabernacle ... the hinging part ... of Aslan's mast. I abandoned the simple, easy method when I decided to make a round mast rather than use a tapered 4 x 4 as called for in the plans. One alternative was to use a strap hinge on the aft portion, and incorporate some kind of latching mechanism on the forward part of the mast (the latch is to secure the mast while you hook up the forestay ... after that, the compression of the shrouds and forestay keep it in place.) But the round profile of the mast allowed a heavy strap hinge to "stick out" too much for the mast hoops to easily pass. Recessing the mast hinge is possible, as George Marousek has done (shown on the MSN Community site.) George's solution is the best looking, but I couldn't for the life of me find the copper or stainless drainpipe material that would form a strong enough sleeve. So I borrowed a traditional method I first saw used on a Weekender with an aluminum mast (Steve Woolverton's Stoodnt Budgit ... sorry, his web site seems to be down.) My test of the concept is shown here with the mast cut on a 30 degree angle, higher portion aft, and two steel straps screwed port and starboard. |
 |
Notice in the photo above, the straps are secured with two or more
screws on the bottom portion of the mast, and just one on the top.
These screws will be replaced with stainless throughbolts, of course, but
for the purposes of this test, they work fine. Unlike the other hinge
methods, the angle cut just needs a slight opening in the aft portion to
allow the top to hinge back. The inside of the lower mast portion,
at this aft position, also needs to be tapered down on the inside to
allow the hinging action to take place. I'll either paint or laminate the
side straps with wood to help disguise them.
When closed like this, the 30 degree angle of the cut and the steel straps hold the mast in position, without the need for a separate latching mechanism on the forward portion. That helps prevent the mast hoops hanging up while dousing the sail. |
 |
 |
 |
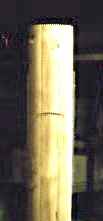
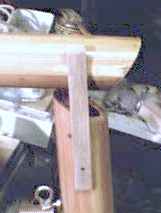
Here the hinging action is shown. After this test was completed, I started working on Aslan's mast. The 30 degree cut is made, and heavy straps have been bolted into place for testing. I found cutting slightly oversized holes for the top bolt helps the mast locate itself on the lower portion. However, I was concerned about the thin walls of Aslan's mast taking the hinge bolt, so I've added a stiffener inside. Its a tapered 1/2" thick piece epoxied in place, going up 8' inside the mast. The portion above this part is plenty strong, as its only 2" in diameter at that point. I'll add more pics after the epoxy cures and I can be certain the mast will take the flexing and abuse of actually being used. |
 |
Added 2/24/01
My first try with larger straps did not work. I used 1 x 8" straps from Home Depot, which I coated with several coats of Rustoleum paint (thinking I'll later get stainless straps.) I first tried to through-bolt them, but found it hard to match up the holes correctly. To make the assembly seat properly when the mast is raised, I had to elongate the holes slightly, but then I lost the tight fit and snugness that I saw with the test piece above. So I went back to the 1/2" wide "test straps" in the pics above, and instead of through-bolting them, used stainless screws to attach them to blocks placed inside the mast. This works extremely well, as less "play" is required for the mast sections to seat. But the straps are unsightly. |
 |
To cover the straps, I cut phillipine mahogany 1" wide by 1/4" thick. The back was hollowed out (first using a chisle on one, then using a Dremel tool on the second one ... the Dremel tool worked much better.) |
 |
The top and bottom ends were rounded over during sanding so that the mast hoops will slide over them easily. Here, the starboard "mast-strap-cover" is pressed onto the strap. Note the hole near the bottom of the "mast-strap-cover." This is where I first thought about attaching the "mast-strap-covers" to the mast straps by having the stainless screws go through from the outside. I declared the experiment a success because it showed the concept wouldn't work (not enough "meat" on the wood to recess the screw head flush and still hold it to the strap.) Perhaps a better woodworker would have known that intuitively, but then he wouldn't have the joy of discovery I did (or the opportunity to once again practice the art of creative cursing.) |
 |
Epoxy to the rescue! The recess in the "mast-strap-cover" was filled with epoxy mixed with maple wood flour (which dries dark brown, matching the final color of the phillipine mahogany once it is stained.) Then the "mast-strap-covers" were placed over the straps, and a creative technique employed which I call "see-if-you-can-reach-that-clamp-over-there-without-letting-go-of-this-gooey-mess." As this picture shows, I was successful, and was able to improve my ability to pick up things with my foot while grunting "oh-oh-oh-oh." Now, for the rest of the set up time, I must remember to go out and move these pieces, else the epoxy will glue my mast into this position permanently. |
 |
 |
Added 2/25/01
The epoxy took a while to set up, even though I used the "Very Fast" type. By 11:30pm, the epoxy seemed mostly cured, so I went to bed with some trepidation that I would find everything, including the clamps, securely glued in position by morning. But all was fine. After some scraping and sanding, I stained the "mast-strap-covers" and put the first of many coats of spar varnish on them. |
 |
Added 3/17/01
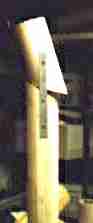
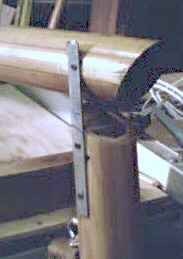
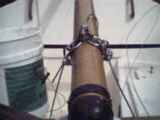
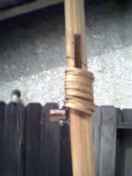
It rained nearly every weekend for a month (except when I had other plans out of town, then I'm sure it was sunny and bright here!) The standing rigging is 1/8" 7 x 19 stainless steel wire, attached to the hollow bird's mouth mast using iron straps around it rather than bolting through it (the mast is weak to two-point crushing, but holds up well this way.) Here, a galvanized and painted chain link fence post strap is employed to secure the forestay and shrouds to. |
 |
For the shrouds, stainless rings are secured to the carriage bolt through the flange of the fence post strap. Thimbles and wire clamps attach the shrouds to the rings. The forestay has a thimble and wire clamp directly over the carriage bolt (seen on top of the mast.) I made the mistake of cutting the forestay too short, attaching it to the wrong point on the bowsprit, so I had to buy another 16' of stainless cable. Oh well, at least it wasn't the 26' shrouds I messed up! |
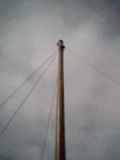 |
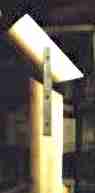
Hey, it looks like a mast now! Except I don't have the running rigging on it yet. I did start it, and its on the Running Rigging page. |
 |
The mast hoops slide easily over the "mast strap covers," and it looks like this will work. There are actually 13 hoops on there, when I only need 10. So the "stack up" won't be quite that high when I bend the sails on. |
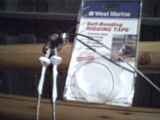 |
The ends of the wire, and the wire clamps, are covered with rigging tape to prevent the sharp edges from damaging sails, skin or other boat parts. This tape is cool, it adheres to itself, but doesn't leave any residue on the part. |
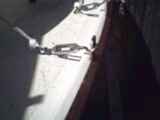 |
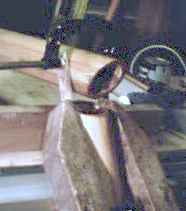
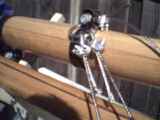
I did have a problem with the turnbuckles when stepping the mast. If the eyes of the turnbuckles fell to the side of the chainplate, as shown here, then it would bind when I attempted to raise the mast. That left me in an awkward position, trying to hold the mast up while trying to also get all 4 of the turnbuckles to un-stick themselves. |
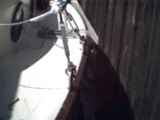 |
So I borrowed a page from the traditional rigging books, and used some tarred marlin (polyester type) to make frapping around the chainplate and turnbuckle eye. It holds the turnbuckle more upright when there's no tension on it, so I can raise the mast easily. |
|
|
|
|
|
|