The Building of Aslan
Updated 07/01/00
The Building of Aslan |
Updated 07/01/00 |
|
|
|
|

As always, let me know if you feel a tool should be included, or disagree with my assessment of a particular tool.
The Essential Tools
Building a Weekender requires cutting 1" thick boards, 4 x 4's and
plywood. You also need to apply glue to wood and screw it together
(I used over 1400 stainless screws in building the hull.) Then, you
need something to "shape" and sand the wood into final form. In this
section, I put alternate tools in parenthesis, and a plus sign means those
two tools may take the place of the essential tool.
 Circular
saw (tablesaw+jigsaw, handsaw) I have an old 7 1/4" Skil brand
circular saw that I've just about worn out over the past 25 years building
decks, patios, and cutting every piece of plywood I've ever cut.
Its on its last legs, and my next circular saw will probably be about the
same quality. You can spend a fortune on one, but for home use, I
think a moderate priced saw like the one featured here is fine. I
love Porter Cable tools, and their circular saw is a good one. The
Skilsaw
is also a good choice that won't break the bank. I have listed the
tablesaw+jigsaw and handsaw as alternatives, but in reality, doing all
the cutting with only a handsaw would take forever. If you have a
tablesaw and a jigsaw, then you can make the majority of the cuts required.
Cutting the 1x lumber for the keel would take a long time with a jigsaw,
though, and would be nearly impossible with a tablesaw.
Circular
saw (tablesaw+jigsaw, handsaw) I have an old 7 1/4" Skil brand
circular saw that I've just about worn out over the past 25 years building
decks, patios, and cutting every piece of plywood I've ever cut.
Its on its last legs, and my next circular saw will probably be about the
same quality. You can spend a fortune on one, but for home use, I
think a moderate priced saw like the one featured here is fine. I
love Porter Cable tools, and their circular saw is a good one. The
Skilsaw
is also a good choice that won't break the bank. I have listed the
tablesaw+jigsaw and handsaw as alternatives, but in reality, doing all
the cutting with only a handsaw would take forever. If you have a
tablesaw and a jigsaw, then you can make the majority of the cuts required.
Cutting the 1x lumber for the keel would take a long time with a jigsaw,
though, and would be nearly impossible with a tablesaw.
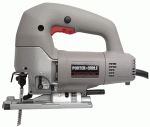 Jig
saw (keyhole saw, handsaw) Many of my first tool purchases were
Craftsman tools, and I hate my Craftsman jig saw. It vibrates like
crazy, and is hard to hold and control for very long because of the vibration.
The cheaper Black and Decker and Skill brands of jigsaws are similar to
my old Craftsman. In my opinion, the jig saw makes the "essential"
list only because it is the best tool for making the porthole rings and
some of the other curved cuts. But it would be harder to make accurate
long straight cuts in plywood with just a jigsaw. This Porter Cable
model gets quite a few good comments for a moderately priced saw, and I
have my eye on it. Perhaps my Craftsman will come to a timely
demise
soon, heh heh. One of the builders from Texas, Kay, has used a jig
saw for cutting out the keel pieces, and feels safer using it. Jig
saws are safer, but they are slower too.
Jig
saw (keyhole saw, handsaw) Many of my first tool purchases were
Craftsman tools, and I hate my Craftsman jig saw. It vibrates like
crazy, and is hard to hold and control for very long because of the vibration.
The cheaper Black and Decker and Skill brands of jigsaws are similar to
my old Craftsman. In my opinion, the jig saw makes the "essential"
list only because it is the best tool for making the porthole rings and
some of the other curved cuts. But it would be harder to make accurate
long straight cuts in plywood with just a jigsaw. This Porter Cable
model gets quite a few good comments for a moderately priced saw, and I
have my eye on it. Perhaps my Craftsman will come to a timely
demise
soon, heh heh. One of the builders from Texas, Kay, has used a jig
saw for cutting out the keel pieces, and feels safer using it. Jig
saws are safer, but they are slower too.
Surform Plane (belt sander, random orbit sander) I love my Surform Plane, but I've gotten plenty of comments from people who hate them. Usually they are working too hard with them. The Surform Plane is like a very sharp cheese grater that is human powered, and can shave off a blizzard of wood chips with the proper technique. And the proper technique is to shave the wood off, not try to make giant divets in it. If you don't have a belt sander, and don't want to buy one, this tool under $15 can save you some money. But be warned, using a Surform Plane instead of a belt sander is similar to hand sanding verses power sanding. I find it extremely rewarding, but there is so much shaping to be done on the Weekender, I did end up buying a belt sander. But the dedicated hand tool user could certainly get by without a belt sander if they had one of these.
2 drills -
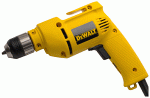
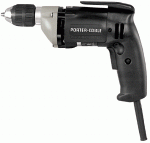 electric
or
electric
or  cordless
(single drill) I used over over 1400 stainless steel screws in the
hull of my Weekender. So buy them in bulk, and plan on having two
power drills. The construction in many areas, such as attaching stringers
to the bottom and attaching the hull sides, requires that you drill the
pilot hole and insert the screw. This bends the wood in a progressive,
gentle manner, and really can't be done by pre-drilling all the holes then
going back and putting in the screws. So I recommend two drills,
the first one drilling the hole with a countersink and tapering bit, then
driving the screw with the other drill. You could choose to use one
power drill and a screwdriver, but it would take quite a while, and your
arm would get sore. The other alternative is to use the new quick
change bits, where you can convert from the tapered pilot hole drill bit
to the #2 phillips bit for the screws. But think about it:
you are putting in 1400 of these things, and so that's 1400 times you are
swapping the bits. For top of the line, I like Porter Cable again,
but DeWalt has some economical drills, and you can always find parts, including
chargers and batteries for their cordless. I also like Makita cordless
tools. If you already have one drill and don't normally need another
one, and your budget won't allow buying a top of the line second drill,
buy another cheap one such as a Black and Decker. You may wear it
out, but at least you won't wear out your arm!
cordless
(single drill) I used over over 1400 stainless steel screws in the
hull of my Weekender. So buy them in bulk, and plan on having two
power drills. The construction in many areas, such as attaching stringers
to the bottom and attaching the hull sides, requires that you drill the
pilot hole and insert the screw. This bends the wood in a progressive,
gentle manner, and really can't be done by pre-drilling all the holes then
going back and putting in the screws. So I recommend two drills,
the first one drilling the hole with a countersink and tapering bit, then
driving the screw with the other drill. You could choose to use one
power drill and a screwdriver, but it would take quite a while, and your
arm would get sore. The other alternative is to use the new quick
change bits, where you can convert from the tapered pilot hole drill bit
to the #2 phillips bit for the screws. But think about it:
you are putting in 1400 of these things, and so that's 1400 times you are
swapping the bits. For top of the line, I like Porter Cable again,
but DeWalt has some economical drills, and you can always find parts, including
chargers and batteries for their cordless. I also like Makita cordless
tools. If you already have one drill and don't normally need another
one, and your budget won't allow buying a top of the line second drill,
buy another cheap one such as a Black and Decker. You may wear it
out, but at least you won't wear out your arm!
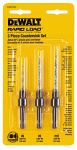
![]() Countersink
and tapering drill bits
Each
of those 1400 screws needs to have a pilot hole drilled through the plywood,
and be countersunk just below the surface. These combination bits
do a good job of doing it all in one operation. You can find these
almost everywhere, but make sure you buy the ones with the adjustable counter
sink so you can control the depth of the pilot hole.. They have a sliding
collar on the bit that allows you to set the depth of the drill.
I used mainly 1" x #6 (6 guage stainless steel screws 1" long) instead
of the 1" x #8 specified in the plans, and like the Sharx stainless screws
from Stainless Fasteners (they have an even taper all the way, without
the slight "hourglass" shape beneath the head. And they don't charge
for
shipping when you buy over 1000.) When choosing screws, remember
that for counter-sinking, flat head phillips are the best bet. The
link is to the ones I used. Some people swear by square drive screws,
but in the smaller sizes, I prefer phillips drive. You can either
buy the #6
Countersink or #8
Countersink bits if you are using the #8 screws, or the combo
pack which gives you the #6, #8 and #10.
Countersink
and tapering drill bits
Each
of those 1400 screws needs to have a pilot hole drilled through the plywood,
and be countersunk just below the surface. These combination bits
do a good job of doing it all in one operation. You can find these
almost everywhere, but make sure you buy the ones with the adjustable counter
sink so you can control the depth of the pilot hole.. They have a sliding
collar on the bit that allows you to set the depth of the drill.
I used mainly 1" x #6 (6 guage stainless steel screws 1" long) instead
of the 1" x #8 specified in the plans, and like the Sharx stainless screws
from Stainless Fasteners (they have an even taper all the way, without
the slight "hourglass" shape beneath the head. And they don't charge
for
shipping when you buy over 1000.) When choosing screws, remember
that for counter-sinking, flat head phillips are the best bet. The
link is to the ones I used. Some people swear by square drive screws,
but in the smaller sizes, I prefer phillips drive. You can either
buy the #6
Countersink or #8
Countersink bits if you are using the #8 screws, or the combo
pack which gives you the #6, #8 and #10.
 Random
Orbital Sander (finishing sander, hand sanding block) An ROS
sander makes the essential list because of the amount of sanding you have
to do. I really like my Porter Cable 5" round ROS sander with the
"hook and loop" surface for the sandpaper discs. It is very easy
to change paper, and using 60 grit almost duplicates a belt sander, although
removing a lot of stock is much slower. With finer grit, such as
100 grit, it works quickly to sand epoxy or Bondo.
Random
Orbital Sander (finishing sander, hand sanding block) An ROS
sander makes the essential list because of the amount of sanding you have
to do. I really like my Porter Cable 5" round ROS sander with the
"hook and loop" surface for the sandpaper discs. It is very easy
to change paper, and using 60 grit almost duplicates a belt sander, although
removing a lot of stock is much slower. With finer grit, such as
100 grit, it works quickly to sand epoxy or Bondo.
![]() Belt
Sander (Surform Shaper, random orbital sander) This is the belt
sander I bought. I love this guy. With a 60 grit belt, it reduces
expensive wood to dust in very short order. With a finer belt its
a bit less aggressive, but belt sanders are rough work tools. And
there's plenty of rough work on the Weekender! As with all power
tools, I have found other uses for my belt sander.
Belt
Sander (Surform Shaper, random orbital sander) This is the belt
sander I bought. I love this guy. With a 60 grit belt, it reduces
expensive wood to dust in very short order. With a finer belt its
a bit less aggressive, but belt sanders are rough work tools. And
there's plenty of rough work on the Weekender! As with all power
tools, I have found other uses for my belt sander.
Some Useful Tools
 Router
I love my Porter Cable router, and used it quite a bit to trim off excess
plywood. But a jig saw and/or Surform shaper could work for that
purpose also. If you have always wanted a router, you will use it
when making the boat. But don't buy it unless you want it for other
tasks. Also, if you do decide to buy a router just for this boat,
a cheaper router would probably do. The Porter Cable is a great router.
Router
I love my Porter Cable router, and used it quite a bit to trim off excess
plywood. But a jig saw and/or Surform shaper could work for that
purpose also. If you have always wanted a router, you will use it
when making the boat. But don't buy it unless you want it for other
tasks. Also, if you do decide to buy a router just for this boat,
a cheaper router would probably do. The Porter Cable is a great router.
 Finishing
Sander. Also a Porter Cable tool, this sander does a great job
between the rubrails where the ROS sander won't fit. It won't work
as well with coarse, 60 grit paper to really hog off a lot of wood, so
you probably can't use it to even out the keel pieces or sand off excess
plywood like you can with a belt sander. It does give a smoother
surface with the finer grits than either a belt or ROS, and with aluminum
oxide sandpaper in the 100 grit range, it puts a nice smooth finish on
the epoxy prior to painting. A nice addition to your tool arsenal,
but not a necessity for building a Weekender.
Finishing
Sander. Also a Porter Cable tool, this sander does a great job
between the rubrails where the ROS sander won't fit. It won't work
as well with coarse, 60 grit paper to really hog off a lot of wood, so
you probably can't use it to even out the keel pieces or sand off excess
plywood like you can with a belt sander. It does give a smoother
surface with the finer grits than either a belt or ROS, and with aluminum
oxide sandpaper in the 100 grit range, it puts a nice smooth finish on
the epoxy prior to painting. A nice addition to your tool arsenal,
but not a necessity for building a Weekender.
 Power
planer. This Hatachi power planer is very economical, and I've
used it quite a bit since getting it (especially on my bird's mouth mast.)
You could use one of these for planing down excess plywood if you didn't
have a belt sander. At under $90, its an economical alternative for
that task, and a good tool to have.
Power
planer. This Hatachi power planer is very economical, and I've
used it quite a bit since getting it (especially on my bird's mouth mast.)
You could use one of these for planing down excess plywood if you didn't
have a belt sander. At under $90, its an economical alternative for
that task, and a good tool to have.
Nice to Have
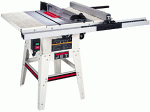 Table
saw I used to say that a table saw was the first stationary power
tool a shop should have, but now I think a band saw is a very good first
choice too. I like the Jet Contractor's saw in this link, and have
been very happy with mine. My first blade was a Freud thin kerf carbide
combination blade, and that served me well. I upgraded to the Forrest
Woodworker II blade ($100+) in the thin kerf version, but to be honest,
for most work the less expensive Freud blade worked nearly as well.
You don't need this to build a Weekender, unless you really, really want
it and have to convince someone ...
Table
saw I used to say that a table saw was the first stationary power
tool a shop should have, but now I think a band saw is a very good first
choice too. I like the Jet Contractor's saw in this link, and have
been very happy with mine. My first blade was a Freud thin kerf carbide
combination blade, and that served me well. I upgraded to the Forrest
Woodworker II blade ($100+) in the thin kerf version, but to be honest,
for most work the less expensive Freud blade worked nearly as well.
You don't need this to build a Weekender, unless you really, really want
it and have to convince someone ...
If you are into woodworking as a hobby, this level of table saw is
a giant step up from the Craftsman at Sears, or the Ridgid brand at Home
Depot. A lot of people also like the Delta Contractor's saw, which
is a few hundred more. But for my money, the Jet has been a great
addition to my shop.
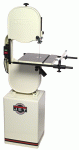 Band
saw As you can probably see, I like Jet's mid-priced stationary
power tools. The 14" band saw is a new addition to my shop, and I
love it. I have used it for many tasks, and will continue to use
it for any curved piece of wood that I can cut on it. The band saw
may be the best first stationary power tool for home shops, as it is safer
to use than a table saw (no kickback, and people almost never disable the
guards on a band saw.) Like the table saw, this isn't a necessity.
But it sure is nice to have!
Band
saw As you can probably see, I like Jet's mid-priced stationary
power tools. The 14" band saw is a new addition to my shop, and I
love it. I have used it for many tasks, and will continue to use
it for any curved piece of wood that I can cut on it. The band saw
may be the best first stationary power tool for home shops, as it is safer
to use than a table saw (no kickback, and people almost never disable the
guards on a band saw.) Like the table saw, this isn't a necessity.
But it sure is nice to have!
|
|
|
|