The Building of Aslan
Updated 7/22/01
The Building of Aslan |
Updated 7/22/01 |
|
|
|
|
|
|
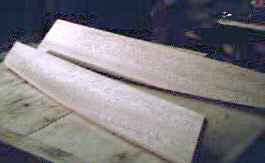 |
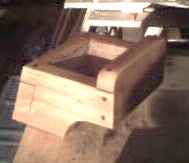
I debated putting the trailboards on, but then after attaching the forestay a couple of times, I thought having them and perhaps a small grate on top would be nice (better footing.) So I took some phillipine mahogany and cut them according to the plans. I then debated fancy carving, mermaids, dolphins and lions ("Aslan" is turkish for "lion.") Then I realized I'm no artist. |
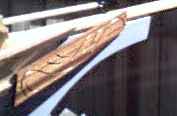 |
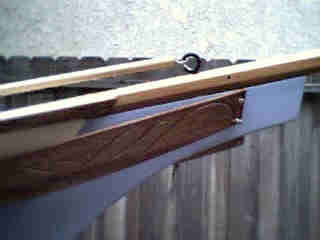
With a Dremel tool, I simply carved some scrolls into the trailboard, and then attached it. I can get fancy later, if I want to, but for now, these look pretty cool. They received the requisite 3 coats of marine spar varnish before mounting, and will be part of the one or two coats that go on before I launch her (want all the cracks and crevices loaded with varnish too.) |
 |
Updated 7/22/01
The trailboards should really be mounted into the stem, not the bowsprit. I wanted to put a grate on top of the bowsprit to assist in kneeling out to hook up the forestay, and thought the trailboards would look best meeting the bottom of the grate. But, traditionally they should not be mounted into the bowsprit, which is subject to flexing, so I changed it. I have an Updates page for modifications after the launch; I'm incorporating them into the regular construction pages so someone visiting here for the first time won't make the same mistakes I made! |
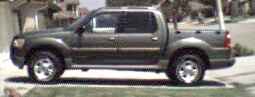 |
This is not a boat. This is my new tow vehicle. My company ended its company car program, so I get a small car allowance. I like the Explorer Sport Trac because it seats 5 in comfort, tows 5800 pounds, and has a small bed for lightweight hauling. I now have a car payment which exceeds my car allowance, so for a moment, finishing Aslan was on hold. |
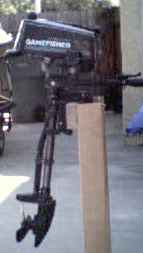 |
At first, I was going to either go without an outboard (in which case my wife would not get on the boat) or try to buy a cheap used one. In California, all 2001 outboards have to be 4 cycle, which leaves only the Honda in the smaller sizes, which sells for more than $700 and is a bit heavy ... 28 pounds. Ouch. In addition, because the only new one in this size range is so expensive, all the used ones have dried up and I was resigned to going out of state for a small, used outboard. I posted a "Wanted to Buy" ad on the Trailer Sailor BBS (http://www.trailersailor.com) and Wayne Pierce emailed me with an offer I couldn't refuse: If I would pick it up, he would give me a Sears Gamefisher 3.0 hp outboard. Now that's a price I couldn't refuse! I first emailed Wayne when he was selling his Potter 19 -- a boat I may move up to if I get tired of sailing little Aslan -- in favor of the smaller Potter 15 for the ease of rigging, etc. The Southern California Potters invite other small boats to come along, so I may do a "sail in" with the Potters after I launch Aslan. In the meantime, I drove my new truck down (about 100 miles each way) and got my outboard, so I'm that much closer to mounting it and getting it launched. |
 |
Updated 4/29/01
Updates occur today on this page and the Running Rigging page (its the page before this one in sequence, so you can click on "Prior" in the navigation bar if you haven't been there yet.) California requires registration of any boat using a motor, or any boat over 12' in length. Having duly registered the boat, I had to put the numbers and sticker on the bow, on each side. |
| Updated 5/05/01
I agonized over where to put Aslan's name and hailing port. First, I thought I would put it on each side under the rub rails, but to put the name on in lettering high enough for folks to read, I was afraid I would end up under the water line. Then I asked on the Wooden Boat forum, and several people said they had lettering on just one side of the transom, and it looked OK. So I started getting quotes for 5" high vinyl lettering in brush script that said "Aslan" and 1" high lettering that said "CHANNEL ISLANDS, CA" under it. Quotes came in from $65 to around $40. |
| On the 'net, I finally found Letters Unlimited, Inc. Very good prices, but you don't really buy on-line. You put in your request, and they call you for a credit card number, verify the space you're putting the letters on, and then ship your order out to you very quickly (got mine in 6 days.) All this for $15.07, including $4.50 shipping. Wow. I figured I could afford to screw this up at that price. The vinyl lettering comes on an opaque wax paper sheet with a semi-transparent sticky cover over it, which is what you see in the photo. Good directions too. To align the lettering, I made a horizontal line parallel with the bottom 9 1/4" up, and aligned the bottom of the paper to it. |
| Following the directions, I first taped the lettering with the transfer sheets where I wanted them, and then put a vertical strip of masking tape down the middle (see the above photo.) Then, you bend back one end, peel back the wax paper the letters are "stuck to" (the sticky paper cover actually sticks better to the front of the letters than the letters stick to the wax paper stuff), cut off the wax paper, and lay the semi-transparent cover down. Then you burnish it with the provided squegee. Then you do the other side. Very easy, very cool. I may re-do my registration numbers this way later on, too. |
 |
Updated 5/13/01
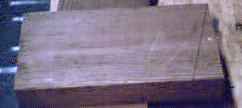
I won a motor mount on eBay, only to find it is too large for Aslan's transom. But in fitting it temporarily, I found that a fixed motor mount would work fine, as there is room for the outboard to tilt forward. Since the 3 hp outboard is so light, I decided to make a fixed mount using some vertical grain douglas fir 2 x 6, and epoxy. I cut an angle on the rails using my miter guage at 70 degrees, and had the blade tilted 3 degrees to more closely match the transom (final fitting will tell if these are correct.) |
 |
A nice arc is cut in each rail at the outboard end, mainly for looks, and the 2 x 6 transom mounting plate is recessed into notches to form a double lap joint, or open tenon, or whatever you would call this! This enables me to have more surfaces for epoxy to glue, and I can drive long screws from the top of the rails into the edge grain of the mounting plate, rather than into its end grain. This transom mounting plate will be securely bolted through both the transom and a backing plate inside to make sure it is secure. |
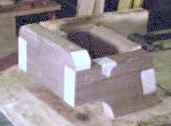 |
For the outboard mount, the 2 x 6 material is cut into a "T" so all forces will be down on the top of the 2 x 6 rails, again allowing me to drive screws down through the top into the edge grain of the rails, with more "glue surface" for the epoxy. Without this configuration, the outboard mount plate would have screws into its weak end grain. The screws will be recessed, with contrasting phillipine mahogany plugs in them. More photos this week as I finish up this last detail before launch! |
 |
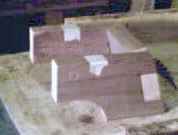
Here it is after the first coat of spar varnish and sanding. An additional three coats were applied to the "outside" surfaces, with the interior getting a coat of dark stain and then three coats of varnish (the inside surfaces were pretty well marked up, and its hard to sand in there!) |
 |
Updated 7/22/01
The plans say to taper the edges of the rudder, but illustrate only the leading (front) edge tapered. I left the rear edge square (with rounded corners that you can't see on this pic.) In our sailing I noticed air bubbles streaming off the tip of the rudder, a sure sign that there's a bit of turbulence down there. And on Lake Casitas, where we got Aslan up to hull speed, there was a lot of shudder. So after talking to some folks, they recommended tapering the trailing edge as well. Note: I have an Updates page for modifications after the launch; I'm incorporating them into the regular construction pages so someone visiting here for the first time won't make the same mistakes I made! |
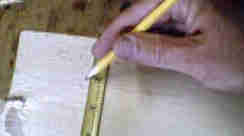  |
I drew a line 2" from the trailing edge by positioning the pencil at that mark on the tape measure and running it down the length of the rudder, on both sides. I also took a dowel centering jig and drew a line down the center of the trailing edge. |
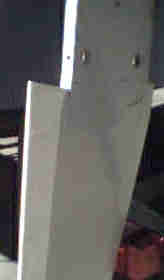 |
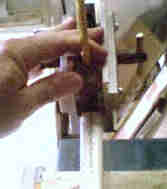
The power plane was used to quickly taper the edge, leaving about 3/16" down the center untapered. This square edge at the rear is supposed to make the rudder work better than having a "knife edge" there. The transition from the flat of the rudder to the beginning of the taper is also pronounced in this picture because of the way the light is hitting it. It is sanded to a smooth transition. Tonight (7/22/01) a coat of epoxy sealed the wood, and I'll repaint it this week. We'll have sea trials of our new rudder this coming weekend. |
|
|
|
|
|
|